【Unity3D开发小游戏】《宝石迷阵游戏》Unity开发教程
注意:
原文链接:https://blog.csdn.net/q764424567/article/details/100543508?ops_request_misc=%257B%2522request%255Fid%2522%253A%2522159652868019725222423591%2522%252C%2522scm%2522%253A%252220140713.130102334.pc%255Fblog.%2522%257D&request_id=159652868019725222423591&biz_id=0&utm_medium=distribute.pc_search_result.none-task-blog-2~blog~first_rank_v2~rank_blog_default-1-100543508.pc_v2_rank_blog_default&utm_term=%E5%AE%9D%E7%9F%B3&spm=1018.2118.3001.4187
一、前言
让我们在Unity做一个宝石风格的游戏。对于那些从未听说过的人来说,宝石迷阵是一个三回合制的游戏,在2001年发布,后来复制为流行的糖果粉碎游戏。(这也使得这是一个Unity糖果粉碎教程).
我们将专注于游戏的核心机制。我们将实现一个8x8网格的宝石,可以互换。目标是始终匹配至少三个相同类型的宝石,无论是水平的还是垂直的。
游戏将用少于140行代码实现。和往常一样,每件事都会尽可能简单地解释,这样每个人都能理解它。
二、资源下载
UI资源和源代码请搜索QQ群:1040082875下载
三、正文
注意:Unity版本 5.0.0f4
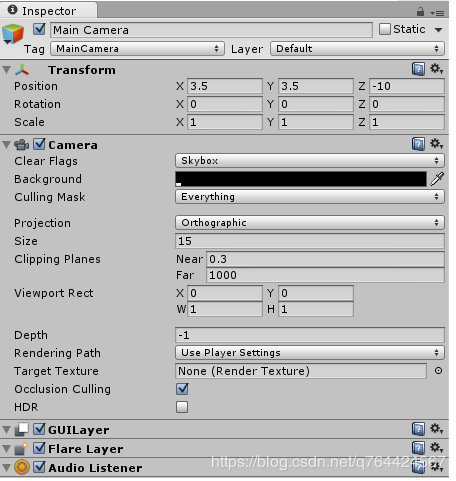
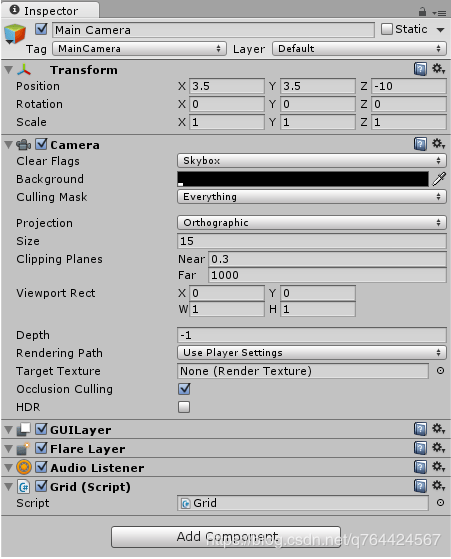
1、摄像机调整
如果我们选择主照相机在层次性然后我们可以设置背景色若要黑色,请调整大小而位置如下图所示:
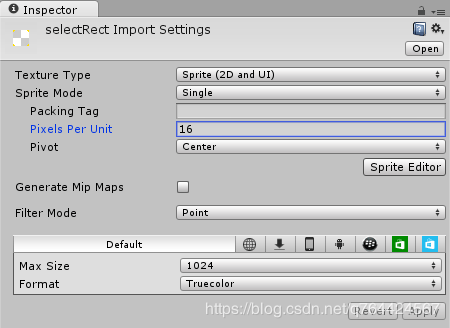
2、宝石

导入到我们项目中,Sprites文件夹:

然后修改设置:
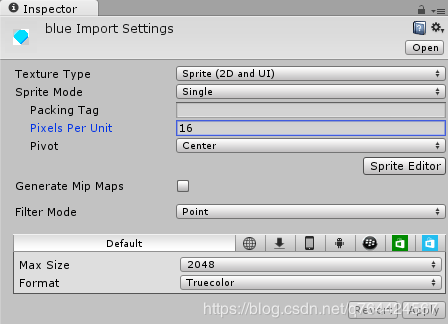
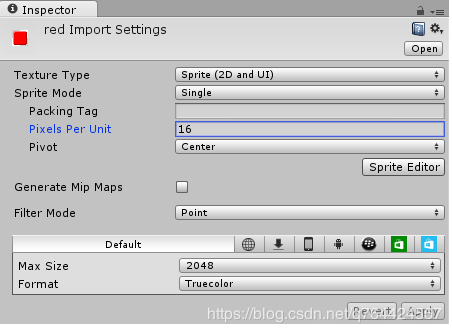
注:Pixels Per Unit:16这意味着16x16像素将适合在游戏世界的一个单位。我们将把这个价值用于我们所有的宝石。其他的值如Filter Mode主要是为了平衡压缩和质量。
创建游戏对象
将宝石拖入到场景中:
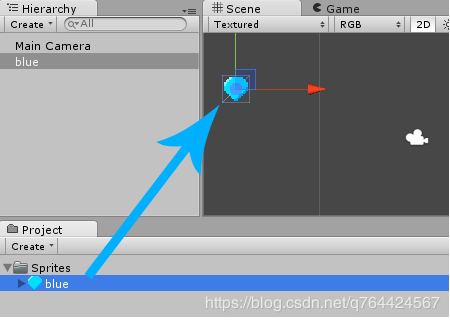
注:我们项目区的宝石图像只是一个图像,仅此而已。但是一旦我们把它拖到场景中,它就变成了一个游戏对象,它有一个位置,一个旋转,一个比例尺,一个渲染器和其他各种我们可以添加到其中的组件。
创建Gem.cs脚本
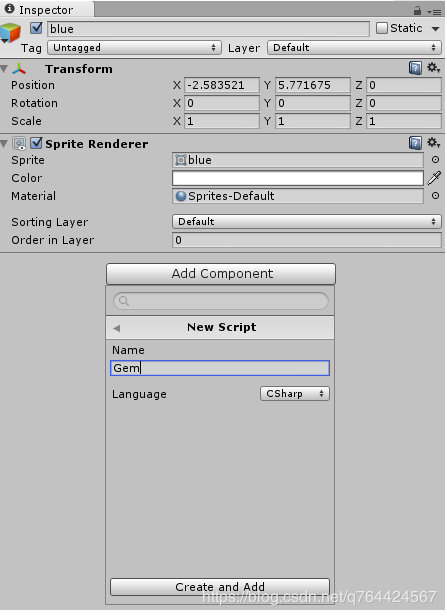
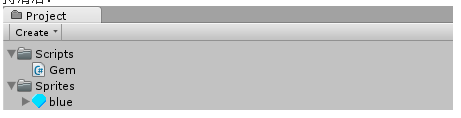
将脚本拖入到Scripts文件夹中(要养成规范分类的习惯):
编辑Gem.cs脚本:
using UnityEngine;using System.Collections;
public class Gem : MonoBehaviour {
// Use this for initialization void Start () { } // Update is called once per frame void Update () { } }
我们不需要启动函数,所以让我们删除它:
using UnityEngine;using System.Collections;
public class Gem : MonoBehaviour { // Update is called once per frame void Update () { } }
让我们添加一个函数,让我们知道两个GEM是否是同一类型的。如果我们能把两个蓝宝石和==,因为它们是不同的游戏对象,所以它们永远不会是平等的。我们只想知道它们是否属于同一种宝石类型,或者换句话说,它们是否使用相同的Sprites:
public bool sameType(Gem other) { return GetComponent<SpriteRenderer>().sprite == other.GetComponent<SpriteRenderer>().sprite; }
注意:如果这还不清楚,想象两颗宝石在一排。如果我们能把它们和==那他们就是不平等因为它们是不同的游戏对象,在不同的位置等等。然而,如果我们将它们与我们的同类型功能,那么它们将是平等如果它们都是蓝色的宝石,或者都是红色的宝石。他们会不平等如果其中一个是蓝色另一个是红色..当一条线上的三颗宝石相等时,它们就是匹配的,可以从游戏中移除。
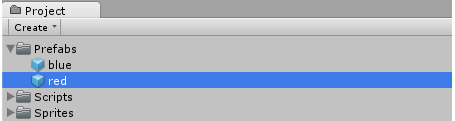
创建宝石的预制体
将宝石拖入到我们的Project面板中的Prefabs文件夹中:
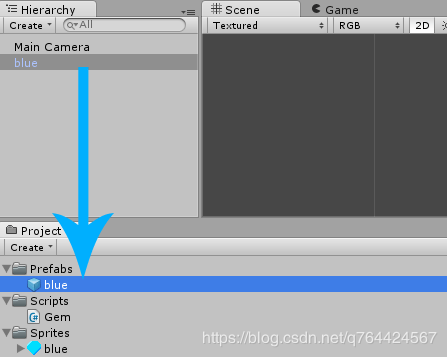
然后,我们就可以在场景中删除blue对象了,因为我们可以在脚本中实例化对象
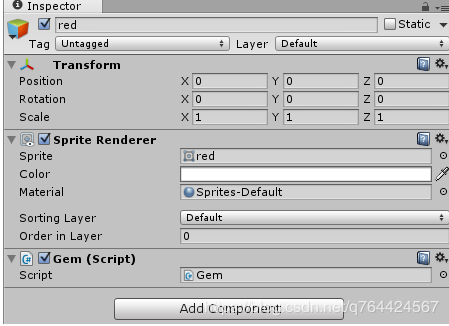
红宝石

设置属性:
然后也把它拖入到场景中,添加Gem.cs脚本,并且设置成预制体:
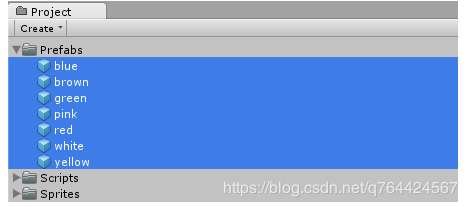
其他宝石


我们将其他的宝石也重复这个流程做一遍:
3、网格
让我们添加一个新脚本叫做Grid.cs,挂载到Main Camera物体上
将Grid.cs脚本拖入到Scripts文件夹中(规范分类啊喂!):
让我们编辑Grid.cs脚本:
using UnityEngine;using System.Collections;
public class Grid : MonoBehaviour {
// Use this for initialization void Start () { } // Update is called once per frame void Update () { } }
我们可以删除启动函数,因为我们不需要它:
using UnityEngine;using System.Collections;
public class Grid : MonoBehaviour { // Update is called once per frame void Update () { } }
网格尺寸
让我们添加一个宽度和高度变量以控制水平和垂直宝石的数量:
using UnityEngine;using System.Collections;
public class Grid : MonoBehaviour { // Grid size public static int w = 8; public static int h = 8; // Update is called once per frame void Update () { } }
注:w平均宽度和h意味着身高。我们会用8对于这两种情况,最后我们得到了一个8×8的网格。我们做了两个变量公共静电这样就可以通过以下方式从任何其他脚本中访问它们Grid.w或Grid.h
4、gemAt函数
在游戏世界里,每个宝石都有一个单位的大小。所以如果我们想把8×8的宝石放进我们的游戏里,我们会把它们放在(0, 0), (1, 0), (2, 0)等等直到(7, 7)。我们需要一种方法来找出某一位置是否有宝石。目前还没有统一的函数,但它有按类型、名称或标签查找游戏对象的功能。所以让我们创造我们自己的宝石函数,它查找所有的Gems,然后过滤掉我们想要的:
public static Gem gemAt(float x, float y) { // Find Gem at Position (x, y) Gem[] gems = GameObject.FindObjectsOfType<Gem>(); foreach (Gem g in gems) if ((Vector2)g.transform.position == new Vector2(x, y)) return g; return null; }
*注意:我们完成了这个功能公众和静态因此,可以通过以下方式从任何其他脚本访问(x,y)。然后我们用FindObjectsOfType找到游戏中所有的宝石。之后,我们把每一个前程然后简单地比较一下这个位置。我们也投了transform.position到矢量2因为这是比较另一个的唯一方法矢量2。如果在(x,y)位置没有宝石,那么我们返回零.*
5、生成宝石
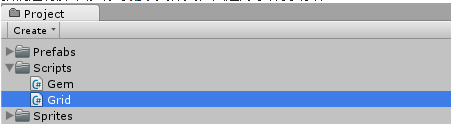
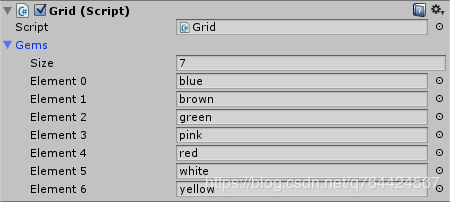
好吧,让我们来生成一些宝石。首先,我们需要一个公众宝石数组,该数组允许我们稍后在检查器中指定所有可用的GEM:
public class Grid : MonoBehaviour { // Grid size public static int w = 8; public static int h = 8;
// Available Gems public GameObject[] gems; ...
*注:[ ]表示Array,这意味着不止一个.*
然后我们保存脚本并查看检查器,我们在宝石插槽输入以下单词:
我们可以写一个在宝石数组中随机选择一个宝石生成的函数,然后将其加载到世界中:
void spawnAt(float x, float y) { int index = Random.Range(0, gems.Length); Instantiate(gems[index], new Vector2(x, y), Quaternion.identity); }
注意:一开始我们使用Random.Range若要在0和gems.Length。之后,我们使用实例化函数将宝石加载到宝石[索引]进入世界的位置(x,y)使用默认的旋转Quaternion.identity.
让我们考虑一下如何使用这个函数。我们知道,当宝石下方有空位时,我们的宝石就会向下坠落。如果所有的Gems自动下降,那么我们只需要检查Gems的最上面一行,所以每当顶部行的条目中没有Gem时,我们就会生成一个:
// Update is called once per framevoid Update () { // Spawn Gem in empty spaces of top row for (int x = 0; x < w; ++x) if (!gemAt(x, h-1)) spawnAt(x, h-1); }
注意:我们使用了为循环遍历顶部行的每个元素,从左到右。然后我们用我们的宝石函数与for循环的x可变和h-1为y变量,因为h-1是最上面的一排。然后,我们使用生成如果在那个位置没有宝石的话。
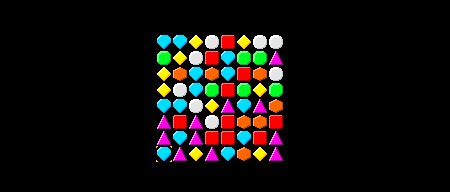
如果我们保存脚本并按下Play,然后我们可以看到顶部的行是如何填充Gems的:

6、使宝石下落
如前所述,如果下面有空位,我们希望宝石向下坠落。让我们打开我们的宝石脚本并修改Update函数:
void Update() { // Fall downwards float x = transform.position.x; float y = transform.position.y;
while (y > 0 && !Grid.gemAt(x, y-1)) --y; transform.position = new Vector2(x, y); }
注意:一开始我们得到的是宝石x和y就位。之后,我们使用当循环减少y通过1一遍又一遍,只要没有宝石(x,y),只要Y>0。之后我们把宝石的位置设为(x,y).**
如果我们保存脚本并按下Play,然后我们可以看到宝石向下坠落:
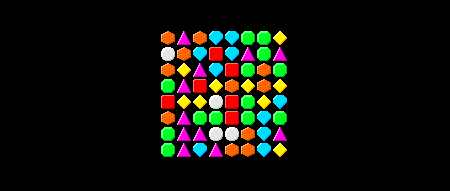
注意:由于它们向下下降,第一行变为空,这将导致生成更多的宝石。
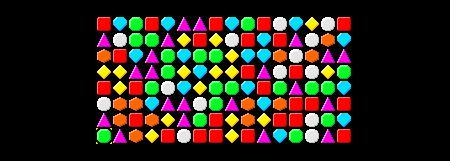
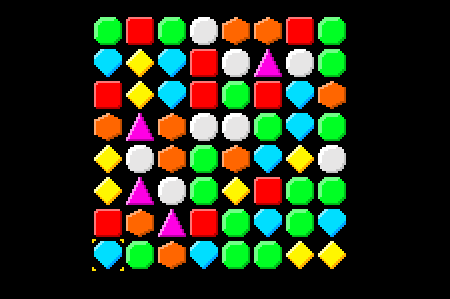
7、寻找匹配
如果我们仔细看一看上面的图片,我们就会发现,有时会有三颗相同类型的宝石相接在一起。(水平或垂直)。让我们创建一个可以检测这些匹配的函数。
有几种方法可以做到这一点。例如,我们可以遍历整个Grid并找到所有匹配,这在计算上有点耗费资源。或者,我们也可以编写一个函数,只需检查某个位置的匹配。所以如果我们给它提供一个像这样的位置(x,y),然后从该位置开始检查水平和垂直匹配。
让我们打开我们的Grid脚本并添加一个新的matchesAt函数,该函数返回给定位置的匹配Gems列表:
public static List<Gem> matchesAt(float x, float y) { List<Gem> res = new List<Gem>();
// ToDo: check horizontal matches // ToDo: check vertical matches
return res; }
注意:确保添加“使用System.Collection.Generic;”,否则Unity不知道什么是List。
下面的图像显示了我们matchesAt函数将发挥作用:
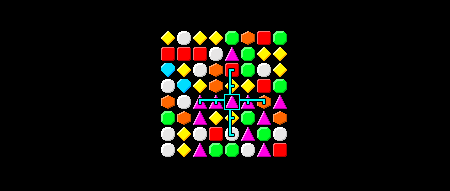
中间的盒子是那个位置(x,y)。找出是否有至少3同类型的水平宝石,我们这样做:
// check horizontallyif same type at (x+1,y): add to matches; if same type at (x+2, y): add to matches;if same type at (x-1,y): add to matches; if same type at (x-2, y): add to matches;if >= 3 matches: add them to result;
或者换句话说:我们往右数所有的匹配项,然后向左数所有的匹配项。如果我们找到至少3个匹配项,则将它们添加到结果中。(因为在我们的匹配项中,任何少于3个匹配项的匹配项都不算在内).
当然,检查垂直匹配也同样容易:
// check verticallyif same type at (x,y+1): add to matches; if same type at (x, y+2): add to matches;if same type at (x,y-1): add to matches; if same type at (x, y-2): add to matches;if >= 3 matches: add them to result;
下面是我们在c#中实现的函数:
public static List<Gem> matchesAt(float x, float y) { List<Gem> res = new List<Gem>(); Gem center = Grid.gemAt(x, y);
// check horizontally List<Gem> hor = new List<Gem>(); hor.Add(center); if (Grid.gemAt(x+1, y) && Grid.gemAt(x+1, y).sameType(center)) { hor.Add(Grid.gemAt(x+1, y)); if (Grid.gemAt(x+2, y) && Grid.gemAt(x+2, y).sameType(center)) hor.Add(Grid.gemAt(x+2, y)); } if (Grid.gemAt(x-1, y) && Grid.gemAt(x-1, y).sameType(center)) { hor.Add(Grid.gemAt(x-1, y)); if (Grid.gemAt(x-2, y) && Grid.gemAt(x-2, y).sameType(center)) hor.Add(Grid.gemAt(x-2, y)); } if (hor.Count >= 3) res.AddRange(hor);
// check vertically List<Gem> ver = new List<Gem>(); ver.Add(center); if (Grid.gemAt(x, y+1) && Grid.gemAt(x, y+1).sameType(center)) { ver.Add(Grid.gemAt(x, y+1)); if (Grid.gemAt(x, y+2) && Grid.gemAt(x, y+2).sameType(center)) ver.Add(Grid.gemAt(x, y+2)); } if (Grid.gemAt(x, y-1) && Grid.gemAt(x, y-1).sameType(center)) { ver.Add(Grid.gemAt(x, y-1)); if (Grid.gemAt(x, y-2) && Grid.gemAt(x, y-2).sameType(center)) ver.Add(Grid.gemAt(x, y-2)); } if (ver.Count >= 3) res.AddRange(ver);
return res; }
注意:这也可以用一个看起来更复杂的for循环来完成。
好的,现在我们有了一个函数,可以让我们找到某个宝石位置的匹配。我们很快就会使用它。
8、解决匹配
假设我们找到了宝石位置的匹配列表。我们还需要一个功能,从游戏中删除那些匹配。我们可以简单地使用Unitys从场景中删除一个游戏对象销毁功能。我们所要做的就是销毁匹配到的宝石列表,在列表中循环,然后销毁每一颗宝石:
public static void solveMatches(List<Gem> matches) { foreach (Gem g in matches) Destroy(g.gameObject); }
现在我们有了一个solveMatches函数,我们可以很容易地在一个特定的位置找到和求解所有的匹配,比如:
solveMatches(matchesAt(x, y));
在下落的时候解决匹配
因为,我们第一次解决可能的匹配项,是在宝石下坠之后。所以让我们回到我们的Gem脚本并修改Update函数:
// Update is called once per framevoid Update() { float x = transform.position.x; float y = transform.position.y;
// Any falling to do? if (y > 0 && !Grid.gemAt(x, y-1)) { // Fall downwards while (y > 0 && !Grid.gemAt(x, y-1)) --y; transform.position = new Vector2(x, y);
// Solve possible matches Grid.solveMatches(Grid.matchesAt(x, y)); } }
现在,当一个宝石在最上面的一行中产生,并且在它下面已经有一个宝石时,它就不会掉下来,这意味着我们现在不检查顶部行的任何匹配项。让我们通过修改Grid的Update函数在我们生成宝石的时候调用:
// Update is called once per framevoid Update () { // Spawn Gem in empty spaces of top row for (int x = 0; x < w; ++x) { if (!gemAt(x, h-1)) { // Spawn spawnAt(x, h-1);
// Something below? Then solve matches if (gemAt(x, h-2)) solveMatches(matchesAt(x, h-1)); } } }
如果我们保存脚本并按下Play
注意:对于最优的游戏体验,减缓整个下降和解决匹配项的过程可能是一个好主意
9、宝石选择
玩家应该能够通过使用箭头键来选择宝石。让我们选择主照相机再次单击添加组件->新脚本,选择C#语言,输入Select。我们还将把它移到Script文件夹中,然后打开它:
using UnityEngine;using System.Collections;
public class Select : MonoBehaviour {
// Use this for initialization void Start () {
}
// Update is called once per frame void Update () {
} }
我们不需要Start函数,所以让我们删除它:
using UnityEngine;using System.Collections;
public class Select : MonoBehaviour {
// Update is called once per frame void Update () {
} }
我们希望在当前选择的周围绘制一个可视指示器,因此,让我们添加选择坐标和视觉指示器的变量,稍后我们将绘制:
using UnityEngine;using System.Collections;
public class Select : MonoBehaviour { // Current selection float x = 0; float y = 0;
// Visual Indicator public Transform selectRect;
// Update is called once per frame void Update () {
} }
然后,我们将设置selectRect的位置:
using UnityEngine;using System.Collections;
public class Select : MonoBehaviour { // Current selection float x = 0; float y = 0;
// Visual Indicator public Transform selectRect;
// Update is called once per frame void Update () { // Set the Indicator position selectRect.position = new Vector2(x, y); } }
现在,我们可以绘制一些矩形,这些矩形将显示在选定的宝石周围:

注意:右击图像,选择另存为.。并将其保存在项目的Assets/Sprites文件夹。
导入设置:
之后,我们可以进入场景,选择Main Camera中的Select脚本,将selectRect GameObject放入到SelectRect卡槽中:

然后,我们按下Play可以看到左下角Gem周围的选择矩形框:

接着我们修改Update函数,再次执行并检查是否按了箭头键,在这种情况下,我们将修改x和y坐标:
// Update is called once per framevoid Update () { // Get Gem at (x, y) Gem selected = Grid.gemAt(x, y); if (selected != null) { if (Input.GetKeyDown(KeyCode.UpArrow) && Grid.gemAt(x, y+1)) ++y; else if (Input.GetKeyDown(KeyCode.DownArrow) && Grid.gemAt(x, y-1)) --y; else if (Input.GetKeyDown(KeyCode.RightArrow) && Grid.gemAt(x+1, y)) ++x; else if (Input.GetKeyDown(KeyCode.LeftArrow) && Grid.gemAt(x-1, y)) --x; }
// Set the Indicator position selectRect.position = new Vector2(x, y); }
注:我们使用Grid.gemAt再次确认在我们要将选择移动到的位置上有一个宝石。
如果我们按下Play,然后,我们可以使用箭头键来选择Gems:
10、交换宝石
玩家应该可以通过按住右移键,然后按下其中一个箭头键来交换两个宝石。让我们修改一下Update函数再次检查按下的Shift键:
// Update is called once per framevoid Update () { // Get Gem at (x, y) Gem selected = Grid.gemAt(x, y); if (selected != null) { if (Input.GetKeyDown(KeyCode.UpArrow) && Grid.gemAt(x, y+1)) { if (Input.GetKey(KeyCode.RightShift)) { // ToDo check if valid swap // ToDo swap and solve if it was valid } else ++y; } else if (Input.GetKeyDown(KeyCode.DownArrow) && Grid.gemAt(x, y-1)) { if (Input.GetKey(KeyCode.RightShift)) { // ToDo check if valid swap // ToDo swap and solve if it was valid } else --y; } else if (Input.GetKeyDown(KeyCode.RightArrow) && Grid.gemAt(x+1, y)) { if (Input.GetKey(KeyCode.RightShift)) { // ToDo check if valid swap // ToDo swap and solve if it was valid } else ++x; } else if (Input.GetKeyDown(KeyCode.LeftArrow) && Grid.gemAt(x-1, y)) { if (Input.GetKey(KeyCode.RightShift)) { // ToDo check if valid swap // ToDo swap and solve if it was valid } else --x; } }
// Set the Indicator position selectRect.position = new Vector2(x, y); }
到现在为止还好。如果没有按下Shift键,那么我们仍然可以像往常一样选择Gems。如果按下Shift键,我们现在应该知道这两个Gems是否可以交换。如果两个GEM将导致匹配,则可以交换两个GEM,因此,让我们添加一个交换两个GEM的函数,以及另一个函数,以确定在交换两个GEM之后是否会发生匹配:
void swap(Gem a, Gem b) { // Swap their positions Vector2 temp = a.transform.position; a.transform.position = b.transform.position; b.transform.position = temp; }
bool validSwap(Gem a, Gem b) { // A swap is valid if it results in matches swap(a, b); bool res = Grid.matchesAt(a.transform.position.x, a.transform.position.y).Count > 0 || Grid.matchesAt(b.transform.position.x, b.transform.position.y).Count > 0; swap(a, b); return res; }
注:swap函数只是交换两个Gem的位置,仅此而已。这个validSwap函数首先交换两个GEM,然后检查是否在两个Gem位置进行匹配,然后将它们交换回来。我们可以看到matchesAt函数在这里非常有用,因为它只检查匹配项,而不对其进行求解。
所以让我们修改Update函数。首先,我们将使用validSwap函数以确定交换是否有效:
// Update is called once per framevoid Update () { // Get Gem at (x, y) Gem selected = Grid.gemAt(x, y); if (selected != null) { if (Input.GetKeyDown(KeyCode.UpArrow) && Grid.gemAt(x, y+1)) { if (Input.GetKey(KeyCode.RightShift)) { if (validSwap(selected, Grid.gemAt(x, y+1))) { // ToDo swap and solve if it was valid } } else ++y; } else if (Input.GetKeyDown(KeyCode.DownArrow) && Grid.gemAt(x, y-1)) { if (Input.GetKey(KeyCode.RightShift)) { if (validSwap(selected, Grid.gemAt(x, y-1))) { // ToDo swap and solve if it was valid } } else --y; } else if (Input.GetKeyDown(KeyCode.RightArrow) && Grid.gemAt(x+1, y)) { if (Input.GetKey(KeyCode.RightShift)) { if (validSwap(selected, Grid.gemAt(x+1, y))) { // ToDo swap and solve if it was valid } } else ++x; } else if (Input.GetKeyDown(KeyCode.LeftArrow) && Grid.gemAt(x-1, y)) { if (Input.GetKey(KeyCode.RightShift)) { if (validSwap(selected, Grid.gemAt(x-1, y))) { // ToDo swap and solve if it was valid } } else --x; } }
// Set the Indicator position selectRect.position = new Vector2(x, y); }
现在,无论交换是否有效,我们都希望交换Gems并解决所有出现的匹配问题。让我们添加另一个助手函数,它就是这样做的:
void swapAndSolve(Gem a, Gem b) { swap(a, b); Grid.solveMatches(Grid.matchesAt(a.transform.position.x, a.transform.position.y)); Grid.solveMatches(Grid.matchesAt(b.transform.position.x, b.transform.position.y)); }
注意:这一次我们交换两个宝石,然后实际解决在两个位置发生的匹配。
让我们把它们放在一起:
// Update is called once per framevoid Update () { // Get Gem at (x, y) Gem selected = Grid.gemAt(x, y); if (selected != null) { if (Input.GetKeyDown(KeyCode.UpArrow) && Grid.gemAt(x, y+1)) { if (Input.GetKey(KeyCode.RightShift)) { if (validSwap(selected, Grid.gemAt(x, y+1))) { swapAndSolve(selected, Grid.gemAt(x, y+1)); ++y; } } else ++y; } else if (Input.GetKeyDown(KeyCode.DownArrow) && Grid.gemAt(x, y-1)) { if (Input.GetKey(KeyCode.RightShift)) { if (validSwap(selected, Grid.gemAt(x, y-1))) { swapAndSolve(selected, Grid.gemAt(x, y-1)); --y; } } else --y; } else if (Input.GetKeyDown(KeyCode.RightArrow) && Grid.gemAt(x+1, y)) { if (Input.GetKey(KeyCode.RightShift)) { if (validSwap(selected, Grid.gemAt(x+1, y))) { swapAndSolve(selected, Grid.gemAt(x+1, y)); ++x; } } else ++x; } else if (Input.GetKeyDown(KeyCode.LeftArrow) && Grid.gemAt(x-1, y)) { if (Input.GetKey(KeyCode.RightShift)) { if (validSwap(selected, Grid.gemAt(x-1, y))) { swapAndSolve(selected, Grid.gemAt(x-1, y)); --x; } } else --x; } }
// Set the Indicator position selectRect.position = new Vector2(x, y); }
注:我们也调整了x和y再次匹配,这样在交换两个宝石之后,当前的选择也会发生变化。
如果我们保存脚本并按下Play,然后我们可以通过在使用箭头键的同时保持右Shift键来交换Gems:
11、摘要
在本教程中,我们创建了一个非常干净和简单的宝石风格游戏在团结。和大多数益智游戏一样,我们需要大量的算法,而使用的统一功能却比平时少。现在该由读者来让游戏更有趣了。可以添加各种有趣的特性:
- 独特的图形风格
- 好看的背景
- 得分
- 保存和加载游戏
- 特殊事件
- 多重关卡